Smoothing Out the Aggravation Bumps on the Road to Good Eating Success
The last post explained that key to making our diet dreams come true is planning so success if inevitable. In turn, the most critical part of inevitability planning is slowing down and adjusting your time frame to accommodate planning and preparation time. For me, this meant postponing my almond milk hopes by a week
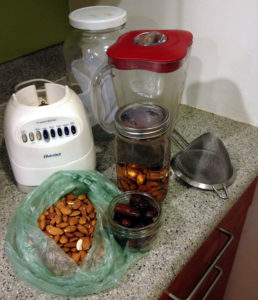
Now I’m back, a week later, fully prepared for milk making. I got plenty of dates and almonds at the store. I’ve chosen a night when I have time for tinkering. The almonds have soaked all day. Haven’t gotten the nut milk bag yet, but I’m ok with using my regular sieve. I’m set to run my nut-milk experiment.
As predicted, I was able to pull it off this time. So what’s the problem, now? Tedium! The process was so clunky and time consuming that couldn’t imagine doing it on a regular basis.
You may recognize that tedious feeling from times when you finally got around to making a new dish. Sure, you might have gotten it on the table–but you don’t want to cook again for another month!
Food preparation can indeed feel tedious when it doesn’t flow smoothly. Instead, it feels like you’re being jerked between stove, sink, instructions and cupboards, all the while dirtying a lot of dishes and not feeling confident or in control. This is often why we get stuck in a 5-Recipe Rut keep making the same things over and over–because we’ve got the process down so it unfolds smoothly and we can cook with some comfort and confidence.
So Barrier #3 on the road to achieving our eating goals is simple tedium. If I wanted milk-making to become a regular part of my food life, I needed to find a way to eliminate the tedium by smoothing out the process. For instance:
- I began feeling uncertain from the get-go when the recipe directions called for soaking the almonds in a bowl. What size bowl? Should it have a cover to fend off wayward flies? Would glass be better than plastic?
- I store my blender in a not-too-convenient bottom cupboard because I rarely use it. So it had to be dug out, assembled and hauled to the sink area.
-

Draining almonds in a sieve Straining the almonds was easy enough with my big sieve–the almonds just fit. Because they just fit, however, I needed to rinse the top layer, dump it into the blender and then rinse the bottom layer. (By the way, soaked almonds are really tasty; I had to try one that fell out of the sieve!)
- Adding the salt and date and additional 4 cups of water was easy, of course. As was pushing the blender’s ON button!
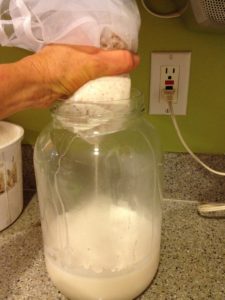
- The straining part was the most problematic, largely because I was using a sieve instead of the recommended nut milk bag. Straining into the soaking bowl would be handy to avoid dirtying another dish, but the milk would soon rise above the bottom of the sieve and prevent any further drainage. Straining into a jar would work, but some of the milk would dribble down the outside of the jar, making a mess. In either case, the sieve was only big enough to strain a quarter of the milk at a time. So I ended up straining each batch into the soaking bowl and then dumping the milk into a quart jar.
- Now, what to do with the pulp left in the sieve that still has a fair amount of milk locked inside? I decided to use a large salad serving fork to mash it against the sides of the sieve to release most of the milk.
- Finally, the mess. Not knowing exactly what tools and equipment to use, I tried them all and had them all to wash–as well as the counters.
What’s interesting is that none of these bumps, in and of themselves, amounted to a serious barrier. However, the sum of those small bumps, one after another, created enough aggravation and tedium that I could have easily and justifiably abandoned my nut-milk experiment right then and there. Sound like what happens when you try a new recipe?
But I didn’t give up. This is where Day 1’s commitment comes in. I had my head behind my actions, at least long enough to give the experiment an honest try. So instead of giving up, I gave my brain a little time to think through the process and see how it can be made smoother and less tedious. I also gave myself time for making a couple more batches to work out the kinks, which led to these improvements:
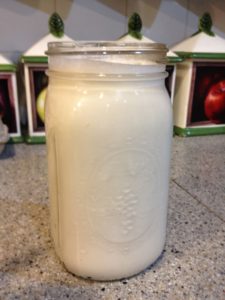
- To minimize dirty dishes, I decided to use a quart mason jar 1) to measure the almonds and the water using the measuring indicators on the side of the jar, 2) to soak the almonds, and 3) to store the finished milk. It also comes with a lid for easy protection. Granted, it isn’t quite big enough to soak 4 cups of water plus 1 cup of almonds, but I made the executive decision to reduce the soaking liquid to 3 1/2 cups!
- I got myself to the store and bought an actual nut milk bag that can easily be squeezed to release the last of the milk from the pulp.
- I remembered a large, 1 gallon jar in the basement and commandeered a large rubber band to secure the milk bag to it. Now the entire batch of milk can be strained at one time.
- Although I dislike appliance-clutter on the counters, I decided that if milk-making was going to be a regular part of my food life, I need to keep the blender in a handier location. I cleared an out of the way corner near the sink for storage. And I plan to store the gallon jar, sieve and nut milk bag in the cupboard below so everything is handy.
- Finally, I timed the process so I can strain the nut milk while I’m in the kitchen cooking breakfast or dinner and can easily monitor it.
These solutions weren’t hard to figure out. They just took slowing down and devoting a little time to figuring out more efficient ways of doing things. You should know, too, that the solutions mostly came to me as I was going about my day; I didn’t have to sit down and puzzle through them for an hour. All I had to do was give my brain space for a little “process thinking.” It then went on auto-pilot and figured out how to smooth out milk-making.
At this point, I’m feeling hopeful that making almond milk can be a regular part of my food life from a time standpoint. Now I need to face the next barrier: Taste. I’ve gone through all the work to make a few batches of almond milk, but do I even like my pure variety? Stay tuned for the next post.
How about you?
- Have you tackled one of your resolutions?
- Is tedium tempting you to give up after the first try?
- Can you give yourself time to think through the process, figure out ways to smooth it out and shore up your confidence?
We don’t always have opportunities to exercise our innate cleverness, but you might surprise yourself with how resourceful you can be–and being clever and self-reliant is a really fun part of the healthy eating journey.
Feel free to brag on yourself and share a little of your cleverness in the comment box below!
Mary, what can you do with the leftover almond “pulp”? Can you use it in a recipe, oatmeal or is it compost for the garden? Jan
Also, have you tried making your own mayo, jerky or soy yogurt and do you have any tips? These are food items I use that are expensive to buy or impossible to find (plain soy yogurt for subbing in recipes).
Great question and exactly the one I had after making my first batch and seeing all the lovely (and expensive) pulp left behind. I do have a couple ideas and will be sharing in the post following the next one–can you wait!? Thanks and please let me know if you come up with anything in the meantime.
Interestingly, I just made my first batch of mayo a couple weeks ago–and it was quite good espeically with the addition of a little Dijon mustard. I just used the recipe from Joy of Cooking (1997 Ed.) and found it was ridiculously easy, as long as you have and use a stand mixer–the old fashioned kind and not a Kitchen Aid. It would be interesting to compare costs as it does use a cup of olive oil.
I have not made jerky or soy yogurt, but your questions bring up an interesting point for me: How the quest for clean foods that are still reasonably priced often leads to making them with ingredients you can control and by using your own (more economical) labor. As I remember, you’re good about doing this and maybe you’d want to share a couple of the things you have figured out. Then I can write a more in depth blog about “mayo-making,” too. I find it curiously exciting to be able to do more and more for myself–and have better control over my health. Thanks for your questions; I’ll continue keeping them in mind.